In the mood for documentation….

Dear colleagues!
Welcome to part 4a of our series on how to set up your own neuromuscular ultrasound lab! As we announced to get this done in 5 steps, we now need to cheat a little bit in order to get there… During the process of writing the lab guide it became clear we have to give you so many tips, that this is necessary.
The first three parts of the lab guide can be found in earlier posts of our blog.
This time we would like to talk with you about the amount of documentation that is necessary and makes sense.
If you have comments or ideas – we are happy to hear them!
Now let´s get started. Fasten your seatbelts and get ready for the first part of our fourth chapter:

4. HOW MUCH AND WHICH DOCUMENTATION SHOULD I DO?
When talking about good documentation, we should start by considering what do we actually expect from documented data? We would define it this way: good documentation allows reconstruction of your findings at any time in the future by a different examiner.
Documentation therefore ideally follows a standardized protocol resulting in a comprehensible sequence of images and – if necessary – videos.
Good documentation includes avoidance of junk data. Sorting out images right after the examination may seem demanding, but pays off already when you start writing the report, not to mention possible re-evaluation of the same patient months or years later.
The exact amount of documentation is dependent on the referral diagnosis and actual findings.
a. Normal findings
Before we go into detail for the different disorders, let´s think about documentation of normal findings.
If your findings are normal, videos won´t add a lot of value. Therefore, unremarkable findings are sufficiently documented with still images according to your standardized protocol.
If you aim at assessing a nerve along its whole accessible course with ultrasound, be aware there are sites for the major nerves of the limb, which have repeatedly been used for e.g. studies on reference values in literature, and can serve as a guideline (see table 1).

b. Entrapment neuropathy
Document the site of suspected entrapment in transverse and longitudinal views – showing measurements of normal values of the CSA in transverse view and absence of a caliber change in longitudinal view.
If the suspected diagnosis is carpal tunnel syndrome or ulnar neuropathy at the elbow you should further go for the wrist-to-forearm ratio in the former or the cubita-to-humerus ratio in the latter. These ratios show significant changes of the caliber of the nerve in its course, which allow you to diagnose entrapment neuropathy with ultrasound although the CSA does not reach pathological values at site of compression.
In case of pathological findings at the entrapment site you can do a short video across the lesion besides the stills listed above. Furthermore, you have to demonstrate that there is no generalized nerve enlargement. We suggest you do this by adding one image of the normal CSA proximal or distal to the entrapment site, probably at one of the more frequent measurement sites listed in table 1. E.g. when you go for peroneal neuropathy at the fibular head, the image of the normal CSA shows the peroneal nerve in the popliteal fossa.
Finally: don’t forget to check for secondary causes of entrapment like tenosynovitis, accessory muscles, ganglions, etc.

Pic 1. Documentation of a classical idiopathic carpal tunnel syndrome
a. Transverse view of the point of maximum enlargement with measurement
b. Median nerve on mid lower arm to prove only focal enlargement with measurement
c. Longitudinal view to document change in caliber
c. Nerve trauma
If there is suspicion of a direct trauma of the nerve, e.g. transection after a sharp injury with a knife or crush injury after being overrun by a car, you will have a defined site of suspected trauma. Assessment of nerves with ultrasound may be hampered or even impossible because of swelling or hematoma in the first days after trauma. Document stills in two planes and a video in transverse view across the lesion. If you find neurotmesis (transection of the nerve) get the retracted proximal and distal endings in longitudinal view with measurement of distance between them. This is important information for planning of surgery.
If there is suspicion of a traction injury in e.g. hyperextension of the upper extremity during the accident, be prepared that this can affect any part of the nerve and sometimes you will even find multiple sites of injury along the course. This is especially true for the radial nerve in humeral fracture, where the common radial nerve might get stretched in the humeral groove and the posterior interosseus nerve at entering of the supinator muscle on the dorsal forearm.
Document a video covering the whole lesion in transverse view. The amount of stills may vary depending on the findings of internal echostructure of the nerve: if the neuroma in continuity only shows fascicular enlargement with preserved perineurium one still proximal to the lesion, one at the site of maximum swelling including measurement and one distal to it should be enough. If you see also partial rupture of the perineurium, get at least one more still of that, too. Again, the longitudinal view capturing the whole extent of the trauma is of great importance. If available on your machine, get a panoramic pic. If not, try to capture multiple images along the course stitching them together yourself. Try to measure the extent of the trauma. In case of nerve surgery, this is again important for planning the procedure.
For both types of trauma make sure you note the position in which the patient was scanned and the distance of the trauma to superficial anatomical landmarks like bony spurs or skin lines.

Pic 2. Documentation of a neuroma in continuity after traction trauma (stills). Localization in relation to visible anatomical landmark medial epicondyle added after scanning.
a. transverse view proximal to trauma with normal looking nerve
b. maximum of CSA reached in the neuroma
c. distal normal looking nerve again
d. partial longitudinal view of the neuroma with loss of internal echostructure
d. Nerve tumor
In case of a tumor within the course of a peripheral nerve, you should provide a well-structured work-up of the tumor itself – get its extension in all 3 dimensions, capture its outer shape, relation to the long nerve axis, its borders, echogenicity and also detectable vascularization.

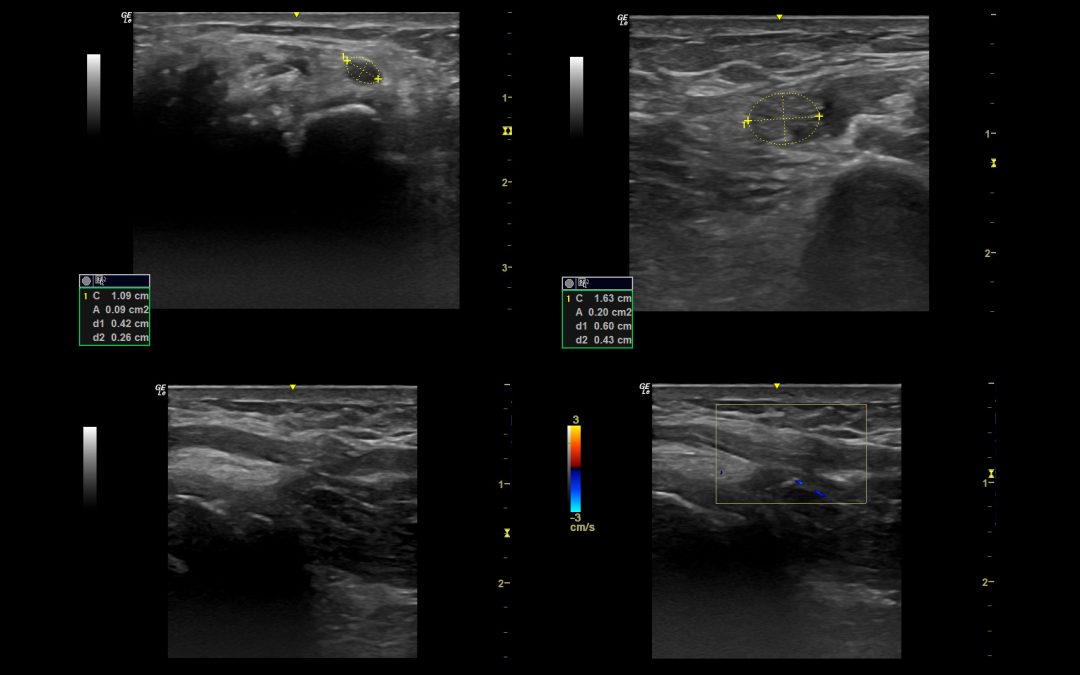
Pic 3. Measurement of a nerve sheath tumor in all three dimensions and vascularization.
We hope that was helpful for you. If you have anything to add or comment – we are happy to hear!
See you soon.
Your Sonocampus Team
Want to make sure you never miss a post again?
Sign up for the newsletter

Recent Comments